
DS18B20の測定温度をGoogleスプレッドシートに送る-農家のIoT入門(9)
無事、複数の防水センサーで温度取得が出来た前回。
取得した温度は、RaspberryPi上だけで確認できる状態なので、以前みたいにGoogleスプレッドシートに送って、クラウド上にあげて、どこからでも温度が見られるようにしましょう。
やり方は、以下のそれぞれの回を参照してください。
ラズパイで温湿度を測定しGoogleスプレッドシートに送る-農家のIoT入門(6)
複数のDS18B20防水センサーで温度測定-農家のIoT入門(8)
DS18B20を複数繋ぐ回路
回路は、前回のままです。
ブレッドボードを使って、DS18B20を2個繋いでいます。
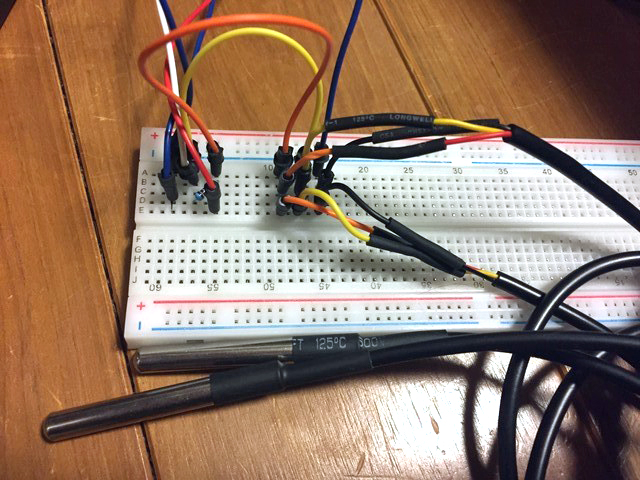
卓上でのテスト用に組んだだけですのでブレッドボードを使っていますが、実用試験段階では室内のRaspberryPiから庭までケーブルを伸ばして、地温を計るつもりです。(下の画像みたいな感じで)

Googleスプレッドシートに温度測定データを送る
では、測定した温度をGoogleスプレッドシートに送るコードを書いてみましょう。
第6回と第8回のコードを、無理やり合体させてみました。
- #!/usr/bin/python
- # -*- coding: utf-8 -*-
- import gspread
- import os
- import glob
- from time import sleep
- import time
- import datetime
- from oauth2client.service_account import ServiceAccountCredentials
- os.system('modprobe w1-gpio')
- os.system('modprobe w1-therm')
- device_file1 = '/sys/bus/w1/devices/28-3c01b607d2db/w1_slave'
- device_file2 = '/sys/bus/w1/devices/28-3c01b6073639/w1_slave'
- def read_temp_raw1():
- f = open(device_file1, 'r')
- lines1 = f.readlines()
- f.close()
- return lines1
- def read_temp_raw2():
- f = open(device_file2, 'r')
- lines2 = f.readlines()
- f.close()
- return lines2
- def read_temp1():
- lines1 = read_temp_raw1()
- while lines1[0].strip()[-3:] != 'YES':
- sleep(0.2)
- lines1 = read_temp_raw1()
- equals_pos = lines1[1].find('t=')
- if equals_pos != -1:
- temp_string1 = lines1[1][equals_pos + 2:]
- temp_c1 = float(temp_string1) / 1000.0
- return temp_c1
-
- def read_temp2():
- lines2 = read_temp_raw2()
- while lines2[0].strip()[-3:] != 'YES':
- sleep(0.2)
- lines2 = read_temp_raw2()
- equals_pos = lines2[1].find('t=')
- if equals_pos != -1:
- temp_string2 = lines2[1][equals_pos + 2:]
- temp_c2 = float(temp_string2) / 1000.0
- return temp_c2
- key_name = './cert/raspberrypi-1-xxx-xxx.json' # GoogleSheet認証キー
- sheet_name = 'RaspberryPi-1sheet' # シート名
- try:
- if __name__ == '__main__':
- scope = ['https://spreadsheets.google.com/feeds','https://www.googleapis.com/auth/drive']
- credentials = ServiceAccountCredentials.from_json_keyfile_name(key_name, scope)
- gc = gspread.authorize(credentials) # JSONキーファイルで認証
- wks = gc.open(sheet_name).sheet1 # sheetをオープン
- while True:
- print(str(datetime.datetime.now()))
- print("t1=" + str(read_temp1()))
- print("t2=" + str(read_temp2()))
- sleep(3)
- datas = [str(datetime.datetime.now()),read_temp1(),read_temp2()]
- wks.append_row(datas)
- except KeyboardInterrupt:
- pass
何度みても、無駄の多いコードです・・(^_^;)
ちゃんと勉強しないとですねぇ。
まあ、とりあえず実行してみましょう!
RaspberryPi側は、前回同様t1とt2にわけて温度を3秒毎に表示します。
で、Googleスプレッドシート側には、日付・温度1・温度2と3つのデータを送ります。
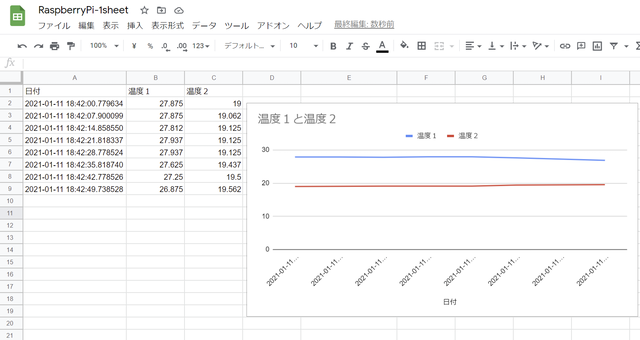
なお、わかりやすくなるよう、温度1はストーブの近くに置いて温度に差をつけてみました。
そして、グラフは行の範囲を予め大きくしてあります。
ですので、データが追加されて行が増えていっても、グラフも合わせて広がっていきます。
どういう範囲まで温度を表示させていくかも、今後の課題ですねえ。
ともかく、ようやくこれで実用試験の準備が整いました!
次回は実際に地温を計って、離れたところから温度の確認をしてみましょう。